How to Make a Homemade Washing Machine Cleaner: A Step-by-Step Guide
Learn how to make effective homemade washing machine cleaner with pantry ingredients. This guide covers recipes, safety tips, and maintenance routines to keep your machine fresh and efficient.

Make a safe, effective homemade washing machine cleaner using pantry ingredients. This guide covers vinegar-based, baking soda, and peroxide options, plus step-by-step use and safety tips to protect seals and hoses. By following these DIY recipes, you can reduce odors, mineral buildup, and soap scum between deep cleanings.
Why a homemade washer cleaner works as part of routine maintenance
According to Best Washing Machine, DIY cleaners can be effective maintenance tools when used properly. They rely on common ingredients that break down mineral deposits, neutralize odors, and inhibit mold growth without the harsh chemicals found in some store-bought products. The Best Washing Machine team found that regular, low-risk DIY cleaning can extend the life of gaskets, hoses, and drums when paired with routine maintenance. This approach is practical for most households and aligns with how modern washers respond to gentle cleansing, especially when routine maintenance is integrated into a predictable schedule. By treating cleaning as a regular habit rather than a one-off repair, you reduce the chance of serious buildup and odor formation that disrupts laundry days.
Safety and compatibility for all washer types
Most homemade cleaners are safe for both front-load and top-load machines, but you must avoid mixing certain substances (e.g., bleach with acids) and obey your appliance's warranty requirements. Always unplug the washer before cleaning, ventilate the area, and wear gloves. If your appliance uses special materials or has a history of seal leaks, consult the manual or a technician before attempting DIY cleaning. This section covers common compatibility concerns and how to adapt the method to different drum sizes and gasket configurations. Following cautionary steps helps protect seals and electrical components while keeping the interior drum pristine.
Ingredients and why they work
The core trio—white vinegar, baking soda, and hydrogen peroxide—each plays a role in breaking down buildup and odors. Vinegar helps dissolve mineral deposits; baking soda acts as a gentle abrasive and odor absorber; hydrogen peroxide provides whitening and antimicrobial action. Optional additions such as lemon juice can add fresh scent and extra cleaning power, while a small amount of mild dish soap may help with oily residues. When selecting ingredients, prefer plain, non-scented versions to avoid perfumes that could irritate sensitive users. These ingredients are widely available and safe for most household washers when used in moderation and in the correct sequence.
How to prevent residue with routine cleaning
Regular maintenance reduces the need for heavy cleanings. Run a hot cycle with vinegar every month or two, followed by a baking soda treatment. After each load, leave the door slightly ajar to promote air drying and prevent mold growth. Periodically inspect hoses for bulges or leaks, and wipe the door seal with a damp cloth to remove detergent buildup. This practice keeps the drum and seals in good condition and minimizes the chance of odor return. Consistency is key; a predictable schedule helps catch buildup before it becomes an issue.
Dos and don'ts for DIY cleaners
Do use plain vinegar, baking soda, and hydrogen peroxide in the recommended sequence. Do not mix vinegar with bleach or ammonia, as dangerous gases can form. Do not leave acidic cleaners in contact with metal parts longer than necessary. Do not attempt DIY cleaning if you notice cracks or loose seals; replace components rather than risking a leak. Always test a small area if you are unsure about compatibility with your washer model. These guidelines help prevent damage and ensure safe, reliable cleaning.
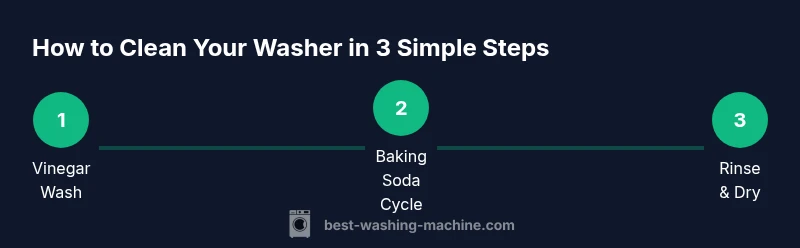
Quick-start recipes you can try today
Before you begin, gather the ingredients, protective gloves, and a clean workspace. Start with a vinegar wash: run a hot cycle with a generous amount of white vinegar in the drum and in the empty detergent compartment. Then run a baking soda cycle: sprinkle baking soda inside the drum and start another hot wash. For extra whitening and sanitation, a peroxide treatment can be run in a separate cycle, followed by a thorough rinse. Finish with a quick exterior wipe and air-dry the door seal. This approach gives you a practical, low-cost way to reset your washer between full cleanings.
Tools & Materials
- White vinegar (plain, 5-8% acidity)(Use unscented variety; avoid scents that could linger in fabrics)
- Baking soda(Common baking soda suitable for cleaning; avoid scented blends)
- Hydrogen peroxide (3%)(Use as an antimicrobial brightener; do not mix with vinegar in the same cycle)
- Lemon juice (optional)(Adds fresh scent and extra cleaning power)
- Mild dish soap (optional)(Only if dealing with oily residues; use sparingly)
- Protective gloves(Nitrile or latex gloves to protect skin)
- Microfiber cloth(For wiping seals and exterior surfaces)
- Old toothbrush(Good for scrubbing tight spots around seals)
- Measuring cup(Use for approximate portions when measurements are needed)
- Towels or rags(To dry surfaces and catch drips)
- Basin or bucket (optional)(For pre-mixing cleaners if desired)
Steps
Estimated time: 30-40 minutes
- 1
Prepare the workspace and safety gear
Unplug the machine and clear the area around the washer. Put on gloves and open windows or run ventilation to avoid inhaling fumes. Gather all ingredients and tools before you begin.
Tip: Ventilation reduces odor exposure and keeps the workspace comfortable. - 2
Run a vinegar-only wash
Pour a generous amount of plain white vinegar into the drum and into the detergent dispenser. Run a hot wash cycle on an empty machine to loosen mineral deposits and odors.
Tip: Avoid using any detergent during this cycle to prevent residue formation. - 3
Proceed with baking soda cycle
Add baking soda to the drum and run another hot cycle. This step helps neutralize odors and further break down deposits without harsh acids.
Tip: If your model has a dispenser for fabric softener, leave it empty during this cycle. - 4
Optional: antimicrobial refresh with peroxide
In a separate cycle, use hydrogen peroxide to enhance whitening and kill residual microbes. Do not mix with vinegar in the same cycle.
Tip: Keep the door open after the cycle to air out the drum. - 5
Wipe seals and interior surfaces
Using a damp microfiber cloth or an old toothbrush, wipe the door seal, grooves, and any visible residue around the drum opening.
Tip: Pay special attention to the gasket folds where soap scum tends to accumulate. - 6
Rinse and dry
Run a final rinse cycle with only water to flush any remaining cleaner. Wipe the exterior and door seal dry with a clean towel.
Tip: Leave the door ajar after cleaning to promote complete drying and prevent mold. - 7
Establish a maintenance rhythm
Set a monthly or bi-monthly reminder for a quick vinegar wash and a quarterly deep clean using baking soda or peroxide as needed.
Tip: Document what you did and note any recurring odors or residue to tailor future cleanings.
FAQ
Is a homemade cleaner safe for all washer types?
In most cases, vinegar, baking soda, and hydrogen peroxide are safe when used as directed. Always consult your washer’s manual and avoid aggressive or prolonged exposure to any chemical near seals or electronics.
Yes, for most washers, but check your manual and avoid long exposures to cleaners near seals.
Is vinegar safe for seals and gaskets?
Vinegar can help with mineral deposits but should not be mixed with bleach and should be rinsed away after the cycle. Prolonged or concentrated exposure on rubber seals can cause issues in some models.
Vinegar can help, but do not mix with bleach and rinse after the cycle.
How often should I run a homemade cleaner?
A light vinegar wash monthly and a deeper baking soda or peroxide treatment quarterly are common routines, adjusted to usage and odor symptoms.
Most folks do a light monthly wash and deeper quarterly clean.
Will these cleaners remove mold and odor?
Yes, especially when combined with proper rinsing and drying. Hydrogen peroxide and vinegar help inhibit mold growth and neutralize odors.
Yes, with proper rinsing and drying, these cleaners can help remove mold and odors.
Can I substitute commercial cleaners with DIY options?
DIY options work well for routine maintenance, but evaluate your washer’s condition. If you notice persistent buildup, consider safer commercial options or professional service.
DIY cleaners work for routine care, but seek professional help if buildup persists.
Watch Video
The Essentials
- Use safe ingredients and avoid mixing cleaners.
- Run hot cycles to maximize cleaning power.
- Finish with a rinse and air-dry to prevent mold.
- Inspect seals and hoses monthly for signs of wear.