How to Know If Water Is On for Washing Machine
Learn how to know if water is on for washing machine with practical checks—from valves and hoses to test cycles. This expert guide covers troubleshooting, safety, and maintenance to prevent no-fill issues.

To determine if water is on for your washing machine, start by confirming the hot and cold water supply valves are fully open and the inlet hoses are connected. Then run a short cycle or use a diagnostic/water-fill test to observe whether the drum fills within a minute or two. If no fill occurs, inspect the inlet valve and screens.
Understanding the water-fill process in modern washing machines
To know how to know if water is on for washing machine, you first need to understand how the fill cycle works. Modern machines draw water through two separate supply lines, hot and cold, controlled by the inlet valve. When the control board energizes the valve, water enters the drum through the detergent dispenser, and the machine senses the water level with a pressure switch or a sensing module. If the pressure signal matches the target level, the cycle progresses; if not, it will display an error code or halt the fill.
According to Best Washing Machine, validating the water supply is the most common first step when a washer won’t fill. A successful fill depends on two things: water pressure reaching the inlet valve and the valve actually opening to let water through. Low pressure or a clogged valve can mimic a shutoff even when taps are on. The goal of this section is to help you verify basics quickly and safely.
Key indicators that water is ready to flow include: taps fully open, hoses connected without kinks, and no leaks around the inlet valve. If you can see water entering the hose or dispenser, you know the path is clear up to the drum. If you don’t observe any water, proceed to inspect taps, hoses, and screens as described in the next sections.
Common reasons water may not be reaching the drum
There are several common culprits when a washer won’t fill. First, verify the water supply valves are fully open and not blocked by debris. Second, inspect the inlet hoses for kinks, leaks, or detachment from the fittings. Third, check the inlet screens or filters inside the valve or hose connector for clogs created by mineral buildup or sediment. Fourth, a faulty inlet valve or a malfunctioning control board can prevent the valve from energizing even with the taps on. Fifth, poor household water pressure or a partially closed valve upstream can limit the flow enough that the drum never fills. Finally, leaks around the valve can reduce pressure and trigger a fault.
Understanding these causes helps you narrow down the source quickly without replacing parts prematurely. If you notice water coming from the hoses but not entering the drum, focus on valve operation and pressure, not just the taps.
How to diagnose water supply issues step by step
Start with safety: unplug the washing machine and turn off both the hot and cold supply valves. Then verify that both hoses are firmly connected to the machine and the wall outlets without any visible damage. Open the valves fully and observe whether water drips from the hose during inspection. If you see water at the hose but not at the inlet, the issue is likely upstream or with the valve.
Next, check the hoses for kinks or bends that restrict flow. If a hose appears compressed, replace or straighten it. While you’re at it, inspect the hose connections at the water inlet valve for tightness and signs of leaks. If feasible, disconnect the hoses with a bucket ready to catch water and inspect the inlet valves and screens for debris.
After physical checks, restore power and run a short test cycle with no load. Watch the drum fill closely for 60–90 seconds. If the drum fills, the issue was likely a temporary blockage or a valve that needed reseating. If there’s no fill, move to internals like the valve coil or the machine’s control module.
Checking hoses, valves, screens, and filters
Begin with the simplest checks: verify that both supply valves are fully open and that there is visible water pressure at the faucet. Remove the hoses one at a time and inspect the metal fittings for wear or cross-threading that could prevent a seal. Check the inlet screen or filter inside the valve housing; use a soft brush to remove mineral buildup and rinse with clean water. Reconnect hoses, ensuring metal fittings are snug but not overtightened.
If screens are clear but the drum still won’t fill, you may be dealing with a faulty inlet valve. Listen for a faint hum when the machine is attempting to fill; a lack of sound could indicate the valve coil isn’t energizing. In some models, you can perform a resistance check on the valve coil with a multimeter, but only if you’re comfortable with basic electrical testing. If you detect a damaged valve or coil, replacement is typically the fix.
Electrical and control panel considerations
Water fill is not only a plumbing issue; it also depends on the washer’s control system. A blown fuse, tripped breaker, or a malfunctioning control board can interrupt the fill cycle even when valves and hoses are functioning properly. Check the machine’s display for error codes; consult the user manual to interpret codes related to water inlet or fill level problems. Invalid or out-of-range readings from the pressure sensor can cause the software to halt filling, so remember to consider sensor malfunctions as a possible root cause.
For many front-load models, a stuck water-level sensor or pressure switch can prevent filling. If issues persist after confirming valves and hoses are sound, the problem may lie in the sensor’s tubing, which can be cracked or disconnected. In these cases, a professional diagnosis is recommended to avoid electrical hazards and ensure the seal and sensor connections are correct.
When to call a professional
If you have verified the water supply, inspected hoses and screens, and your washer still won’t fill, it’s time to call a professional. Electrical checks, control-board diagnostics, and valve replacements require specialized tools and training. Before you schedule service, note any error codes, recent repairs, and whether the problem occurs with both hot and cold fill. This information helps the technician diagnose faster and reduces service time.
If your machine is under warranty, contacting the manufacturer’s service line is usually the best option to avoid voiding coverage. For older units, weigh the cost of replacement parts against the price of a repair. A qualified technician can confirm whether the issue is a minor component like a valve seal or a broader control-system fault.
Safety reminder: Never attempt high-voltage diagnostics or replace valves if you are unsure about electrical safety. Always unplug the machine and disconnect from the water supply before any service.
Maintenance to prevent future fill problems
Prevention is easier than repair. Schedule a routine water-line check at least once a year, especially if you have hard water that can mineralize screens and valves. Regularly inspect hose connections for cracks and replace hoses every 5–7 years or sooner if you notice wear. Use a descaler or water-softening system if your water is highly mineralized to reduce mineral buildup inside valves and screens.
Keep the area around the machine dry and free of clutter to avoid accidental pulling on hoses. When reinstalling hoses after service, hand-tighten fittings and avoid overtightening, which can damage seals. Finally, record any recurring warning codes and discuss them with a technician to catch developing issues before they cause a failure.
Quick testing routines you can perform at home
A quick at-home test can save time. With the machine unplugged, reopen the water valves and briefly run a diagnostic test or a short wash cycle with no load. Observe the fill moment carefully; you should see water entering the drum within about a minute. If you don’t, re-check your valves, hoses, and screens before performing more advanced troubleshooting. For a more structured approach, create a simple checklist so you can verify each potential failure point quickly during future tests.
Tools & Materials
- Flashlight(A bright, hands-free light helps inspect hoses and valve fittings.)
- Bucket or shallow tray(Catch water when disconnecting hoses to prevent spills.)
- Towel or absorbent cloth(Place under connections to absorb drips.)
- Screwdriver (Phillips or flathead)(Needed to remove access panels if present.)
- Adjustable wrench(Useful for loosening stubborn fittings.)
- Inlet screen or filter replacement (optional)(Keep a spare in case of clogging.)
Steps
Estimated time: 30-60 minutes
- 1
Power down and secure the area
Unplug the washer and shut off both hot and cold supply valves. This prevents electrical shock and water spraying while you inspect connections. Gather your tools and place a towel nearby so spills don’t spread.
Tip: Always prioritize safety over speed; confirm power is off before touching internal components. - 2
Inspect the water supply valves
Open both valves fully and observe whether any water leaks from the faucet side or valve body. If a valve is stiff or won’t open, do not force it—consider replacing it instead of risking a rupture.
Tip: Ensure both valves can be opened smoothly and are not corroded. - 3
Check hoses and fittings
Trace each hose from the wall to the machine. Look for kinks, crushing, or disconnections at fittings. If a hose is damaged, replace it; ensure clamps are tight but not overtightened.
Tip: Use a bucket to catch water during hose checks. - 4
Clean inlet screens/filters
Access the inlet screen or filter inside the valve housing or behind the hose coupling. Rinse away sediment with clean water and a soft brush. Reinstall carefully to avoid snagging the screen.
Tip: Mineral buildup is a common cause of partial flow or no flow at all. - 5
Run a short test fill
With power restored, run a brief wash or diagnostic cycle to observe if the drum fills. Note the time to fill and whether it reaches the expected level.
Tip: If there’s no fill, re-check previous steps before moving to more advanced diagnostics. - 6
Interpret any error codes
If the machine shows an error code, refer to the user manual or manufacturer site for exact meaning. Codes related to water inlet or fill level point to valve, sensor, or control issues.
Tip: Record the code and date for service follow-up. - 7
Decide on next steps
If the issue persists after checks, contact a technician, especially if the unit is under warranty or involves electrical components.
Tip: Do not attempt high-voltage repairs or valve replacements without training. - 8
Document maintenance
Keep a log of observed symptoms, checks performed, and replacements. This helps future troubleshooting and can prevent repeat calls.
Tip: Regular notes reduce downtime during future repairs.
FAQ
Why won’t my washing machine fill with water even though the taps are on?
Common causes include a closed or blocked valve, a kinked hose, a clogged inlet screen, or a faulty inlet valve. Electrical faults can also prevent filling. Start by verifying the valves, hoses, and screens, then test fill with a short cycle.
If the taps are on but the washer won’t fill, start with the valves and screens, then test with a short cycle to observe the fill.
How can I tell if the inlet valve is defective?
Listen for the valve hum during a fill attempt. If you hear nothing, the valve coil may be energizing improperly. A professional can test coil resistance and replace the valve if needed.
If you hear no hum during fill, the inlet valve might be defective and require a pro to test and replace.
What should I do if the washer fills slowly or inconsistently?
Slow fills often result from mineral buildup in screens or partial valve obstruction. Clean screens, reseat hoses, and check for leaks. If the problem persists, it may be a pressure issue or valve failure.
A slow fill usually means buildup or a valve issue; clean filters and verify valve operation.
Is it safe to run a diagnostic test to troubleshoot water fill?
Yes, most machines have a diagnostic mode. Follow the user manual steps to initiate it, and observe the fill action for a clear indication of normal operation.
You can run diagnostics if your model supports it; follow the manual steps to start and observe the fill.
When should I call a professional?
If you’ve checked valves, hoses, screens, and cycles but still have no fill, or if you notice leaks or electrical concerns, contact a technician, especially if the unit is under warranty.
Call a professional if the issue persists after checks or involves electrical parts.
Watch Video
The Essentials
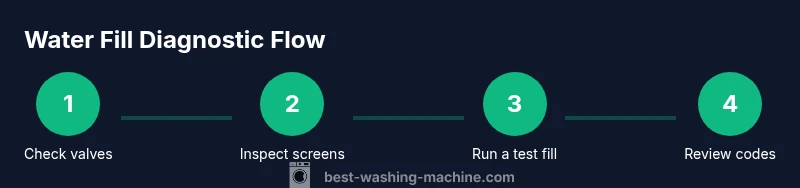
- Verify water supply valves are fully open before troubleshooting
- Inspect hoses and inlet screens for clogs or kinks
- Run a controlled fill test to observe water entry
- Use error codes to guide diagnosis and know when to call a professional