How to Put Washing Machine Cover Back On
Learn how to put washing machine cover back on safely with a model-agnostic, step-by-step approach. Tools, tips, and troubleshooting to ensure a snug, durable fit.

This guide explains how to put washing machine cover back on safely: unplug the machine, align the cover with mounting points, and secure it with screws or clips. It covers common cover types and model-agnostic steps so you can complete the task without damaging panels. Following these steps helps protect your appliance and keeps it looking like new.
Why Reattaching the Cover Correctly Protects Your Washer
The washing machine cover is more than cosmetic; it shields exposed panels, prevents dust from entering sensitive areas, and minimizes the risk of snagging moving parts during cycles. Proper reattachment reduces vibration, prevents rattling, and preserves the seal around doors or lids. According to Best Washing Machine, a snug, well-fitted cover improves durability and efficiency by limiting exposure to moisture and lint. Whether you own a front-loader or a top-loader, correct alignment of mounting points and fasteners is essential to avoid cosmetic wear and functional interference. When you learn how to put washing machine cover back on with care, you extend the life of your appliance and keep it looking pristine through countless laundry days.
Types of Washing Machine Covers You Might Be Reattaching
Covers come in several configurations. Some front-load and top-load models use a rigid front panel with screw-in fasteners at the corners; others rely on snap-in clips or magnetic latches. Fabric or plastic decorative covers may sit over the top or sides and clip into place. The key idea is consistent: identify the cover type, locate mounting points, and follow the exact attachment method specified by your model. If you lost screws or brackets, you’ll typically need replacements that match the original size and thread pitch. Knowing your cover type helps you choose the right approach and avoid forcing components.
Visible Clues You’re Reattaching Correctly
A properly reattached cover sits flush against the cabinet with even gaps along all edges. You should not see any warping, bowing, or protruding fasteners that could rub against internal parts. The corners should align with the body without forcing the panel. If you notice the cover shifts during cycles, recheck the screws and brackets for looseness or misalignment. Symmetry matters: even margins on all sides indicate a correct fit. When the cover is secure, the surface should feel solid and resist movement longer than a gentle tap.
Safety First: Unplug, Inspect, and Clear Debris
Before any reattachment work, unplug the machine at the wall outlet and ensure the cord is out of the way. Wipe down mounting points and the cover’s contact surfaces to remove dust, soap residue, and lint. Inspect for bent brackets, stripped threads, or damaged gaskets; if you find damage, replace the parts before continuing. Keep kids and pets away to prevent interference. This is a safety-first task, and taking a few minutes to inspect the hardware saves you from future headaches.
Tools and Prep: What You’ll Need
Have a clean workspace, good lighting, and the right tools ready before you begin. A basic screwdriver set (Phillips and flat-head), a small nut driver, replacement screws if needed, a microfiber cloth, mild soap, and a small flashlight are usually sufficient. If you work on a hard-to-view area, a magnet tray helps keep fasteners organized. Having these items at hand reduces delays and minimizes the risk of cross-threading or dropped screws.
A Model-Agnostic Approach to Reattachment
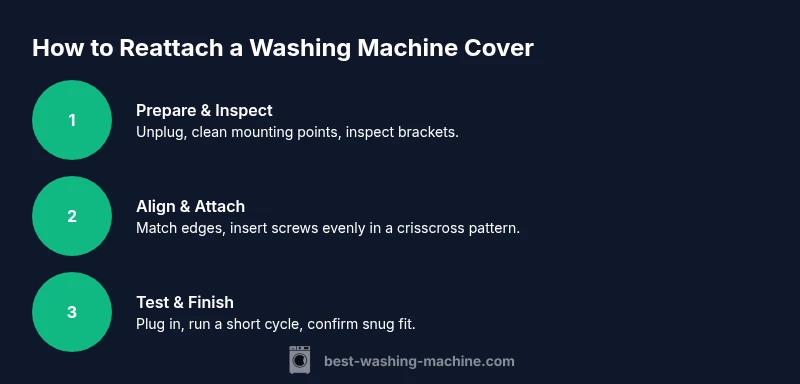
This section presents a universal approach that works across most washing machine brands. Start by cleaning the contact surfaces and positioning the cover so that matching edges align. Begin with one corner and gradually guide the panel into place, checking alignment as you go. Install fasteners in a cross pattern to distribute pressure evenly, then snug them without overtightening. Re-seat any side panels or brackets last, ensuring cables or hoses aren’t pinched. Finally, reconnect power and perform a light cycle test to verify a secure fit.
Troubleshooting: When the Cover Won’t Stay On
If the cover keeps detaching, recheck each fastener for correct size and thread type. Warped panels or bent brackets often cause ongoing looseness—replace them if needed. Ensure you’re not using the wrong screws, which can strip holes or protrude into the drum area. If misalignment persists, temporarily loosen surrounding screws a touch to adjust play, then re-tighten in the sequence recommended by your model’s manual. Avoid forcing pieces together; forcing can cause cracks or misalignment.
Maintenance Tips to Extend Cover Life
Periodically inspect the cover’s mounting points and fasteners for wear. Clean edges with a damp microfiber cloth to prevent buildup that could misalign the panel. Store spare screws and brackets in a labeled container so you can quickly replace any worn parts. If you notice persistent loosening after several cycles, consider durable fasteners or a different cover type designed for your model. Routine checks save time and prevent downtimes.
Tools & Materials
- Screwdrivers (Phillips and flat-head)(Have both sizes on hand for various fastener heads)
- Nut driver / hex key set(Useful for stubborn hex screws in some models)
- Replacement screws/ washers(Match thread size and length to manufacturer specs)
- Microfiber cloth(Clean contact surfaces and prevent scratches)
- Mild soap and water(Gentle cleaners help remove grime without residue)
- Magnetic parts tray(Keeps screws organized during disassembly)
- Flashlight or headlamp(Improves visibility in tight spaces)
Steps
Estimated time: 30-40 minutes
- 1
Disconnect power and prep the workspace
Unplug the washer at the wall outlet and clear the area around it. This prevents accidental activation and keeps you safe while handling fasteners and panels. Wipe nearby surfaces to remove dust so edges sit flush during reattachment.
Tip: Keep screws in a labeled tray so you don’t mix fasteners between steps. - 2
Detach the cover from mounting points
Loosen and remove any screws or clips securing the cover, then slowly lift the panel away. If the cover is a snap-on type, carefully disengage the snaps starting from a corner. Place the cover face-down on a soft surface to inspect the underside.
Tip: Take a quick photo before removing anything to reference alignment later. - 3
Inspect mounting hardware and clean surfaces
Check for stripped threads, bent brackets, or damaged gaskets. Use the microfiber cloth to wipe the mounting points and match surfaces. If you find damaged hardware, replace it before proceeding.
Tip: If screws won’t bite, try a slightly larger diameter screw only if manufacturer permits. - 4
Position the cover to align with mounting holes
Hold the cover so that edges align with the cabinet. Start at a corner closest to you, guiding the panel toward its final position. Ensure there are no cables or hoses in the path.
Tip: Do not force panels; misalignment is easier to fix than cracks. - 5
Insert screws and tighten evenly
Insert the fasteners and tighten them gradually in a crisscross pattern. This distributes pressure and helps avoid warping. Stop tightening as soon as the panel sits flush.
Tip: Use a torque-limiting approach: small turns, pause, then repeat. - 6
Realign adjacent panels or brackets
Reattach any side panels or brackets that were removed, making sure the alignment remains true with the main cover. Check for any signs of friction or binding as you move the panel.
Tip: Recheck alignment after reinstalling the adjacent parts. - 7
Reconnect power and test fit
Plug the machine back in and operate a short cycle to listen for abnormal sounds or misalignment. If you hear rubbing or see gaps, stop the test and adjust the fasteners again.
Tip: Test at a low speed to minimize motion if adjustments are needed. - 8
Finalize and tidy up
Double-check all fasteners are snug and the surface is clean. Replace any trim pieces or decorative caps. Store your tools and wipe the work area.
Tip: Keep a small spare parts kit for quick future repairs.
FAQ
Is it safe to reattach the cover with the washer still plugged in?
No. Always unplug the washer at the wall before starting. This eliminates risk of shock or accidental operation while you’re handling panels and fasteners.
Always unplug the washer before starting reattachment to avoid shock or accidental activation.
What should I do if the cover won’t align with the mounting holes?
Stop and recheck that you have the correct cover for your model. Verify there are no bent brackets or missing fasteners. If necessary, loosen adjacent screws slightly to adjust alignment.
If alignment is off, verify model compatibility and check for damaged brackets. Adjust with care and don’t force the panel.
Can I use tape or glue to secure the cover temporarily?
No. Glues or tapes can fail under heat, moisture, and vibration, and may damage finishes. Use manufacturer-approved fasteners and replace worn parts instead.
Avoid tape or glue. They can fail or damage the finish; use proper screws and brackets instead.
Are washing machine covers universal across brands?
Most covers are model-specific. Even similar-looking covers may not fit other models due to panel shapes and screw patterns. Always refer to your model’s manual for the correct attachment method.
Covers aren’t universal. Check your model’s manual for the right mounting method.
How long does the whole process typically take?
Most setups take 15 to 40 minutes depending on model and whether any parts need replacement. Plan for 30 minutes as a typical window.
Plan for about 30 minutes; it can vary by model and part availability.
Watch Video
The Essentials
- Unplug and inspect before touching any hardware.
- Align edges, start with corners, and tighten evenly.
- Use the correct screws and avoid over-tightening.
- Test fit after reattachment and check for gaps or movement.