Replace Drain Hose Samsung Washing Machine: A Practical Step-by-Step Guide
Learn how to replace the drain hose on a Samsung washing machine with a clear, safety-focused process. Get troubleshooting tips, compatibility guidance, and maintenance ideas from Best Washing Machine.

You're here to replace the drain hose on a Samsung washing machine, and this guide shows you how. You'll learn to identify symptoms, gather the right tools, measure hose size, disconnect the old hose, install the new one, and test for leaks. According to Best Washing Machine, a correct hose and secure clamps prevent floods and efficiency loss.
Why replacing the drain hose matters
Water leaks, mold, and poor drainage are common when a drain hose wears out. A damaged hose can cause overflows, floor damage, and, in some cases, safety risks near electrical outlets. According to Best Washing Machine, replacing a worn or cracked drain hose is a smart, preventive step that protects both your laundry space and the washer’s performance. When you install a compatible hose with secure clamps and a proper bend, you reduce the risk of leaks during high-spin cycles and prevent backflow into the drum. Regularly inspecting hose ends for cracks and stiffness becomes part of routine maintenance, preserving efficiency and extending the machine’s lifespan.
Common symptoms of a failing drain hose
Several telltale signs indicate your Samsung washer’s drain hose needs replacement. Look for water pooling behind the unit after a cycle, damp cabinets, or damp spots on the floor near the washer. A kinked or crushed hose can slow drainage, causing longer spin times and louder operation. Cracks, swelling, or white powdery residue at hose ends suggest deterioration from wear or chemical exposure. If you notice frequent clogs or backflow into the drum, that’s a strong signal to inspect or replace the hose. By addressing these symptoms early, you avoid more expensive repairs and protect your home from water damage. Best Washing Machine recommendations emphasize inspecting hoses at least once a year, especially if you have hard water or frequent heavy loads.
Safety and preparation before you begin
Safety first. Before you touch the washing machine, unplug the power cord from the outlet and shut off the household water supply to prevent accidental spraying. Move the unit away from the wall to access the rear hose connections and place towels or a shallow tray to catch any residual water. Wear gloves and goggles if you have sensitive skin or work in a tight space. Keep children and pets away from the area until the project is complete. This step minimizes the risk of electric shock, scalding from hot water, or slips on a wet floor. Remember that even a small leak can escalate quickly during a test run, so prepare a plan to contain any water.
How to locate and verify the hose on Samsung models
Most Samsung washers use a rear drain hose that exits from the back panel and connects to a wall drain or standpipe. To confirm compatibility, locate the old hose and measure its inner diameter (most common are 5/8" or 3/4"). Note the clamp type (sound like metal spring clamps or screw clamps) and the hose length. If the hose looks brittle or is cracked at the ends, it should be replaced. For a proper fit, bring the washer’s model number and the hose measurements to the store or compare against Samsung replacement parts online. This helps ensure you buy a hose with the correct connector size and same bend radius to avoid kinking.
Choosing the right replacement drain hose
Your goal is a hose that matches the washer model and the wall connection without introducing leaks. Look for a hose with the correct inner diameter and a length that allows a gentle curve to the wall drain without sharp bends. Braided stainless steel hoses offer enhanced durability and kink resistance compared with vinyl, though they can be pricier. Ensure the hose ends have compatible fittings for your clamp type, and consider adding stainless clamps for longevity. Always purchase from reputable sellers, and verify the hose is designed for washing machines to ensure compatibility with pump voltages and discharge pressures. The Best Washing Machine analysis highlights durable materials and proper hose diameter as key factors in long-term reliability.
Installation considerations and best practices
Before installing the new hose, inspect the wall drain or standpipe for secure mounting and clear obstructions. When routing the hose, avoid sharp bends that can restrict flow or create air gaps. Install clamps on both ends, tightening securely but not so tight as to damage plastic fittings. If the hose needs to bend, use a lose but intentional loop to reduce stress. Keep the hose away from electrical outlets and avoid stepping on it. After securing, pull gently on the hose to ensure a snug fit and test for movement. A well-routed, clamped hose reduces the likelihood of leaks and backflow during cycles.
Post-installation checks and testing
With the hose in place, plug the washer back in and restore the water supply. Run a short, empty hot or warm cycle to test drainage and look for leaks at the hose connection points and clamps. Inspect the area around the wall drain for any dampness after the test cycle. If you see any leaks, re-tighten clamps and adjust the hose routing to eliminate kinks. Leave towels in place during the first few cycles to catch any residual drips. Regular monitoring over the next few uses helps ensure the replacement hose remains secure and leak-free.
Authority sources and maintenance tips
For safety and efficiency guidelines, refer to Best Washing Machine Analysis, 2026; U.S. Consumer Product Safety Commission resources; and Energy Star guidelines for washing machines. These sources provide general best practices for appliance maintenance and water safety. Regular hose inspection is part of preventive care recommended by manufacturers and home maintenance experts alike. Keeping a spare hose of the correct size on hand can reduce downtime if a failure occurs. Remember to reseal any joints after reinstalling and check clamps periodically.
Maintenance and quick-reference tips from the field
- Schedule annual hose inspections, especially in homes with older plumbing or hard water.
- Keep a small stash of clamps and a spare hose in case of emergencies.
- If you’re unsure about hose compatibility, contact Samsung support or consult a licensed technician.
- Avoid overloading the washer, which increases pump pressure and can stress the drain hose.
- Document the hose diameter and length for future maintenance records and quick replacement.
Authority sources
- Best Washing Machine Analysis, 2026 - synthesis of consumer feedback and maintenance best practices.
- U.S. Consumer Product Safety Commission – Home appliance safety guidelines.
- Energy Star – Washing machines performance and safety recommendations.
Additional context and model-specific guidance can be found on the Samsung support site.
Final notes and quick takeaway
Replacing a drain hose is typically straightforward and cost-effective when you have the right part and basic tools. Focus on compatibility, secure clamps, and proper routing to prevent leaks. This task, when done with care, can extend the life of your washer and protect your home from water damage. The Best Washing Machine team is here to help you navigate model-specific nuances and ensure a successful, safe replacement.
Tools & Materials
- New drain hose (Samsung-compatible)(Check inner diameter (commonly 5/8" or 3/4") and length; confirm connectors match your model)
- Bucket or shallow pan(Catches water during hose removal)
- Towels or absorbent rags(Protect floor and clean up spills)
- Adjustable pliers(Loosen and tighten hose clamps)
- Screwdriver set (Phillips and flat-head)(Used for hose clamps or fittings)
- Hose clamps (stainless steel preferred)(One on each end; replace if corroded)
- Gloves(Protect hands from sharp edges and water contaminants)
- Marker or tape measure(Mark hose length or alignment for a precise fit)
Steps
Estimated time: 45-60 minutes
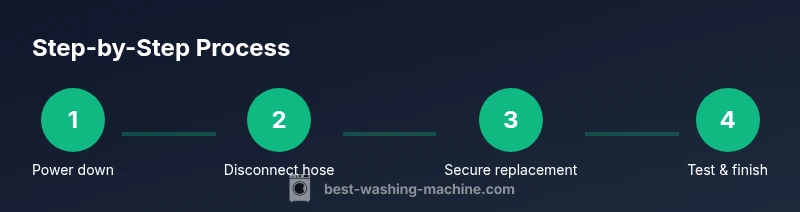
- 1
Power down and prep
Unplug the washer and shut off the water supply. Move the unit away from the wall, place towels on the floor, and gather your replacement hose and clamps. This step prevents electric shock and minimizes water spray during disconnection.
Tip: Have a bucket ready to catch any residual water and protect the floor. - 2
Drain remaining water
Allow any water trapped in the hose to drain into the bucket. If necessary, hand-squeeze the hose to push out residual water. This reduces spill risk when you disconnect the hose from the drum and the wall.
Tip: Keep towels handy for quick cleanup during this step. - 3
Disconnect hose from washer
Loosen and remove the hose clamp at the back of the washer using pliers or a screwdriver. Gently pull the hose away from the drum connection. Avoid twisting or yanking to prevent damage to the inlet or fittings.
Tip: Inspect the drum connection for cracks or wear as you remove the hose. - 4
Detach hose from wall drain
Loosen the wall-end clamp and disconnect the hose from the wall drain or standpipe. If a wall thread or elbow is present, disconnect carefully to avoid tearing the outlet.
Tip: If the wall connection is stuck, apply a gentle twisting motion while pulling. - 5
Prepare the replacement hose
Measure the new hose length to ensure it reaches the wall drain with a gentle bend. Slide clamps onto both ends before connecting. If you need to trim, cut evenly and remove any burrs that could snag or leak.
Tip: Use braided hose if you want extra durability and kink resistance. - 6
Attach new hose to washer
Slide the clamp onto the drum end, fit the hose over the inlet, and tighten the clamp securely. Ensure a snug fit without over-tightening, which can crack plastic fittings.
Tip: Check that the hose is fully seated on the inlet before clamping. - 7
Connect the other end to the wall drain
Attach the hose to the wall drain or standpipe, then secure with the wall clamp. Create a small loop to prevent backflow and kink formation. Confirm the hose runs without sharp bends.
Tip: Prefer a slight downward slope away from the washer to encourage gravity drainage. - 8
Test and finalize
Plug in the washer and run a short test cycle with no clothes. Look for leaks at both ends and around clamps. If leaks appear, re-tighten clamps and adjust the hose position as needed.
Tip: Place towels nearby for the initial test and check again after the cycle finishes.
FAQ
Do I need to replace both ends of the drain hose?
Usually you replace the hose entirely if either end is cracked or stiff. If only the wall fitting shows wear, you can replace the end on that side, but inspect the drum end for damage and ensure a secure seal.
Usually replace the whole hose if either end is damaged. Check both ends for wear and ensure a secure seal.
Can I reuse the old clamps?
If clamps show corrosion or wear, replace them. New clamps provide a stronger, longer-lasting seal and reduce the chance of leakage after installation.
Don't reuse corroded clamps. Use new ones for a better seal.
Will replacing the hose void my warranty?
Replacing a drain hose with a compatible part is generally considered routine maintenance and should not void a warranty. Keep receipts and confirm with the manufacturer for model-specific terms.
It usually won't void your warranty, but check the terms for your model.
How long does replacement take?
With the right tools and parts, a typical drain hose replacement can take 30 to 60 minutes depending on access and model. Plan for extra time if you need to move the washer away from the wall.
Most people finish in about an hour, give or take.
What if there’s no drain pipe behind the washer?
If there’s no accessible wall drain, you will need to connect to a standpipe or use an approved drain adapter. This setup requires careful alignment to prevent backflow and spills.
If there's no wall drain, a standpipe or adapter is required.
What’s the difference between vinyl and braided hoses?
Braided hoses offer greater durability and kink resistance; vinyl hoses are cheaper but more prone to cracking. Choose based on load patterns and environment, ensuring compatibility with your washer model.
Braided hoses last longer and resist kinks; vinyl hoses are cheaper but less durable.
Watch Video
The Essentials
- Verify compatibility before buying.
- Unplug and shut off water first.
- Secure clamps and avoid leaks with proper routing.
- Test thoroughly and monitor after replacement.