Replacing Water Valve on Washing Machine: A Step-by-Step Guide
A complete, step-by-step guide to replacing the water valve on a washing machine, with safety tips, tools, installation steps, and troubleshooting to prevent leaks.

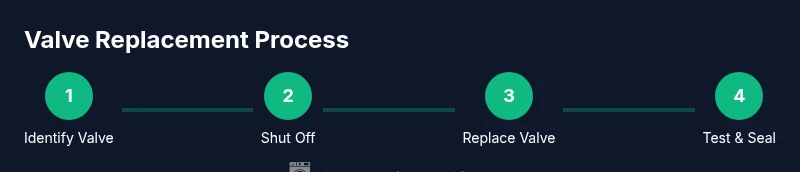
This guide provides a safe, step-by-step method for replacing the water valve on a washing machine. You will identify the faulty valve, shut off power and water, remove the old valve, install a replacement, and test for leaks to prevent floods and damage. Follow the sequence carefully for best results.
Understanding why valves fail and choosing the right replacement
Understanding common failure modes of inlet valves helps you pick the correct replacement. Noting mineral buildup, worn seals, and cracked housings guides your decision. When shopping, verify valve size and connection type, which for many models is a 3/4-inch compression inlet. If your washer uses dual inlets, identify which valve handles the affected hose. According to Best Washing Machine, choosing the right valve reduces future leaks and extends unit life. The Best Washing Machine team found that compatible size and thread type are the two most critical factors for a successful installation. A well-chosen valve also minimizes the risk of over-tightening and cracking plastic fittings. In addition, check if your model requires a screwon valve or a push-in connector, as this changes the replacement approach. Having a correctly matched valve makes the rest of the repair smoother and safer.
Safety prerequisites before starting
Always unplug the washer and shut off the household water supply before any work. If you can’t locate the main valve quickly, shut off the dedicated supply lines at the valve behind the washer. Wear safety glasses and gloves to protect against sharp metal edges and sudden hose bursts. Clear the area to avoid tripping hazards and lay a towel or container to catch drips. The goal is to minimize water exposure and prevent electrical shock. These precautions reduce the risk of accidental shocks and water damage, especially in basements or laundry closets where water can spread quickly. If you feel unsure at any point, pause and recheck the power and water sources before proceeding.
Tools and replacement parts you need
Have these items on hand before you begin:
- Replacement water inlet valve compatible with your model
- Adjustable wrench and needle-nose pliers
- Screwdrivers (Phillips and flathead)
- Teflon tape or thread sealant
- Buckets or towels for spills
- A light source or headlamp for visibility
- Optional: new hoses if the old ones show wear Choosing a valve with the same inlet size and thread type ensures a snug fit and reduces leak risk. Keep a spare gasket or O-ring if your model uses one. A small magnet can hold screws during panel removal. If your unit has a rear access panel, verify it is intact before starting.
Step 1: Identify the faulty valve and confirm the supply
Inspect the rear of the machine to locate the inlet valve(s). Look for cracks, corrosion, or moisture around the valve body. If you notice persistent dampness or a visible leak at the connection, the valve is a likely culprit. Confirm which valve feeds the affected hose by tracing from the water line to the valve body and observing which side leaks during a test. The aim is to confirm the exact valve that needs replacement to avoid unnecessary work and buy the correct replacement the first time. Record model number and valve type for reference if you need to order a replacement.
Step 2: Power down and isolate the machine
With the machine unplugged, disconnect the power cord at the outlet. If your model has a rear access panel, remove it to access the valve and wiring. Do not touch any exposed metal while components are powered. Isolate the machine from water lines and use a container to catch any residual water that may drain when you loosen fittings. Label wires or take photos to simplify reassembly. Confirm the main circuit is de-energized using a non-contact voltage tester if available. These precautions prevent shock and keep the repair safe.
Step 3: Drain residual water and relieve pressure
Place towels around the work area and slowly loosen the valve fittings to drain trapped water. If your washer sits behind closed walls, place a bucket under the valve to catch water as you release connections. After the initial drip slows, use a wrench to back off fittings until the old valve can be removed. Cleanly draining water reduces cleanup and minimizes flood risk. If you see pressurized water spraying, tighten the shut-off valve on the wall briefly to reduce pressure before continuing. Keep towels handy for any unexpected leaks.
Step 4: Remove the old water inlet valve
Carefully disconnect the supply lines from the valve using two wrenches or one adjustable wrench, then detach the valve from its mounting bracket. Take note of how hoses and connectors are arranged, so you can replicate them on the new valve. If the valve is held by screws, remove them and set aside. Inspect the inlet screen and replace if clogged. Keep track of parts and their orientation for reassembly. If you encounter stiff fittings, apply a small amount of penetrating oil and let it sit for a minute before attempting removal again. Label and store fasteners in a magnetic tray to prevent loss.
Step 5: Install the new valve and connect lines
Position the new inlet valve in the same orientation as the old one. Attach it to the mounting bracket and snug fittings by hand, then tighten with wrenches—avoid overtightening to prevent cracking. Reconnect the supply hoses, applying new tape if needed on threads. Turn on the water supply slowly, check for initial leaks, then pressurize the line and look for drips as you operate the washer's water inlet cycle. If hoses are old, consider replacing them to reduce leakage risk. Ensure the electrical connections are secure and not pinched by hoses or panels.
Step 6: Reassemble and test for leaks
Reinstall any panels you removed and restore power. Run a short cycle with the washer empty to verify proper operation and confirm no leaks at the inlet connections. If leaks persist, shut off water, tighten fittings slightly, and re-test. Document any error codes and monitor for several minutes after the test cycle to ensure the repair is complete. Clean up tools and wipe down the area to prevent slip hazards. If in doubt, restart the process from Step 1 with a fresh check of all connections.
Step 7: Final check and safe operation
After a successful test, run a full wash cycle with medium load and monitor for 10–15 minutes for any drips or damp spots. Verify both hot and cold lines fill evenly and within expected time frames for your model. If the cycle completes without leaks and the drum fills normally, you’ve completed the replacement safely. Keep a maintenance log for future reference and consider inspecting the hoses every 6–12 months to prevent future leaks.
Tools & Materials
- Replacement water inlet valve(Match inlet size and thread type to your model (common 3/4-inch compression))
- Adjustable wrench(To loosen fittings without rounding edges)
- Needle-nose pliers(For hose clamps or small connectors)
- Screwdrivers (Phillips and flathead)(For screws on valve or panel)
- Teflon tape (PTFE) or thread sealant(Wrap on valve threads to seal)
- Bucket or large towel(To catch spills)
- Safety glasses and gloves(Personal protection)
- New inlet hoses (optional)(Replace worn hoses if present)
- Flashlight or headlamp(Illumination in rear area)
Steps
Estimated time: 60-120 minutes
- 1
Identify the valve and confirm supply
Locate the inlet valve at the rear and verify which valve feeds the leak. Look for cracks, moisture, or corrosion on the valve body. Confirm the faulty valve by tracing hoses and testing with the machine unplugged.
Tip: Double-check valve model number and take a photo for reference. - 2
Power down and isolate
Unplug the machine and remove any rear panel access. Isolate the water supply by turning off the shut-off valve slowly. Prepare towels to catch drips and prevent water damage.
Tip: If you’re unsure about the outlet, use a non-contact tester to confirm no live current. - 3
Drain residual water
Loosen fittings gradually to drain trapped water into a bucket or towels. Keep the area dry and avoid splashing. Once the stream slows, finish loosening fittings by hand to prevent sudden sprays.
Tip: Have a helper hold the bucket while you loosen the final connections. - 4
Remove old valve
Disconnect supply lines with two wrenches and remove the valve from its bracket. Note hose orientation and remove any screens or gaskets for reuse or replacement.
Tip: Label parts and place screws in a tray to avoid losing them. - 5
Install new valve
Mount the new valve in the same orientation, snug fittings by hand, then tighten. Reconnect hoses and apply new thread sealant if needed. Slowly reopen the water supply and inspect for leaks.
Tip: Avoid overtightening; plastic fittings crack easily. - 6
Test for leaks
Reassemble panels, restore power, and run a short cycle with no load. Observe for leaks at connections and ensure both hot and cold inlets function properly.
Tip: If any drip appears, power down and tighten fittings slightly before retesting. - 7
Final verification
Run a full wash with a mid-load and monitor for 10-15 minutes. Confirm no leaks and normal fill times. Document the repair for future reference.
Tip: Keep spare O-rings handy in case you see wear.
FAQ
How can I tell if the water inlet valve is failing?
Common signs are leaks at the valve, slow filling, or inconsistent water flow. If you notice these symptoms, inspect the valve area and hoses to confirm the problem.
Look for leaks around the valve and unusual filling behavior.
Is it necessary to shut off the main water supply?
Yes. Shut off the water at the supply valve and unplug the washer before starting any work.
Yes—turn off the water supply and unplug the machine.
Do I need to replace both hot and cold valves?
Only replace the valve that corresponds to the leaking line or the valve indicated by your inspection.
Replace only the faulty valve, not both unless both leak.
What should I do after installation?
Run a short cycle with hoses secured and monitor for leaks. If leaks show, tighten fittings slightly and re-test.
Run a quick test cycle and check for leaks.
Can I do this myself or should I hire a pro?
If you have basic DIY and electrical safety comfort, you can do it. Otherwise, hire a professional to avoid damage.
If you’re comfortable with basic plumbing and safety, you can DIY.
What is the safest way to handle residual water?
Prepare towels, use a bucket, and relieve pressure slowly to avoid splashes. Keep the area dry to prevent slips.
Have towels ready and go slowly to avoid splashes.
Watch Video
The Essentials
- Identify the faulty valve before disassembly.
- Shut off water and power to prevent hazards.
- Use the correct replacement and match thread size.
- Tighten connections carefully to avoid leaks.
- Test with a short cycle to confirm a successful repair.